H2: IoT Hardware for a 12-Factor Application
Make no mistake sensors will drive the next-generation user experiences. We’ve just got started with wearables.
- Karthee Madasamy, MD, Qualcomm Ventures
The previous blog is at: “H1: Deciphering the 12 Factor Applications style”
Introduction
The Internet of Things (IoT) is a term that refers to the network of devices that connect to each other via the internet. It involves connecting commonplace items or things to the internet via sensors and IP addresses. Anything from your shoes to your automobile to your coffee pot may be considered an everyday object. Connecting these gadgets to the internet allows data and user analytics to be extracted. The data and analytics gathered may be utilised for a variety of purposes, including surveys, automation, alerts, and just improving user experiences.
This project is primarily a hardware device with a hint of IoT. We have two systems: a frontend system, which will be our hardware device, and a backend system which will be our server. Our IoT setup will constitute an in-house JKUAT SES development board which is based on the ESP32 WROOM chips(i.e Any ESP32 chip can therefore be used as an alternative) and a DHT11 module as our temperature and humidity sensor. With this, we can send temperature and humidity data to our backend services for monitoring purposes.
For connectivity, the ESP32 chip has an in-built WIFI module that allows us to go into production by deploying the device to homes given that most homes have WIFI installed.
Project Stack and Components
JKUAT SES development board
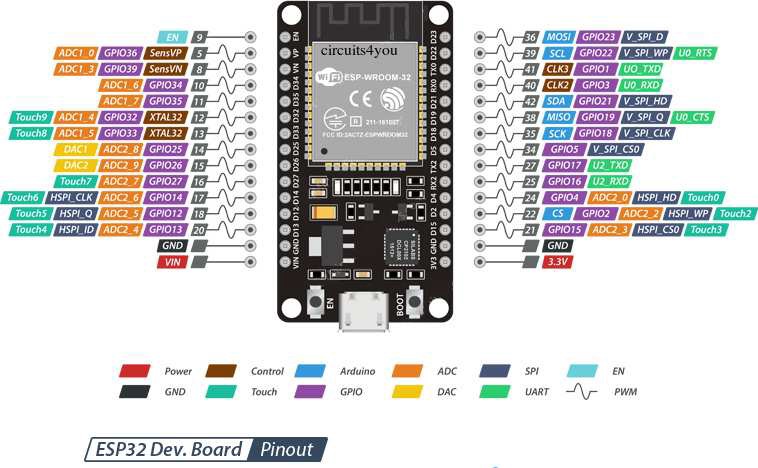
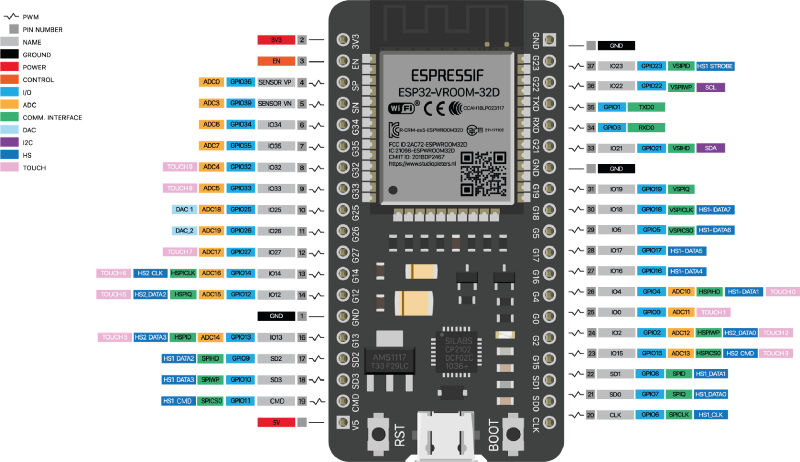
The schematic and the board layout of JKUAT SES development can be found here. In case you are using any other ESP32-based board, the following two schematics can be helpful.
ESP32 pinout
DHT11
To detect water vapour, the electrical resistance between two electrodes is measured by the DHT11. A moisture-holding substrate with electrodes placed to the surface serves as the humidity sensor component. When water vapour is absorbed by the substrate, ions are released, increasing the conductivity between the electrodes. The relative humidity affects the change in resistance between the electrodes. The resistance between the electrodes reduces as the relative humidity rises, whereas the resistance rises as the relative humidity falls.
The DHT11 has a built-in thermistor that monitors temperature. The calibration coefficients are stored and controlled by an IC on the device.
MQTT
The Internet of Things (IoT) has gone from zero to pervasive hype in a very short period. Message Queuing Telemetry Transport, or MQTT, is, I believe, one of the most critical elements affecting the condition of IoT today.
Message Queuing Telemetry Transport (MQTT) is a lightweight messaging protocol designed for usage in situations where clients require a minimal code footprint and are linked to unreliable networks or networks with restricted capacity. It’s mostly utilised for M2M (machine-to-machine) communication and Internet of Things connectivity.
MQTT was developed in 1999 by Dr Andy Stanford-Clark and Arlen Nipper. The communication method’s original aim was to allow monitoring equipment in the oil and gas sector to communicate data to remote servers.
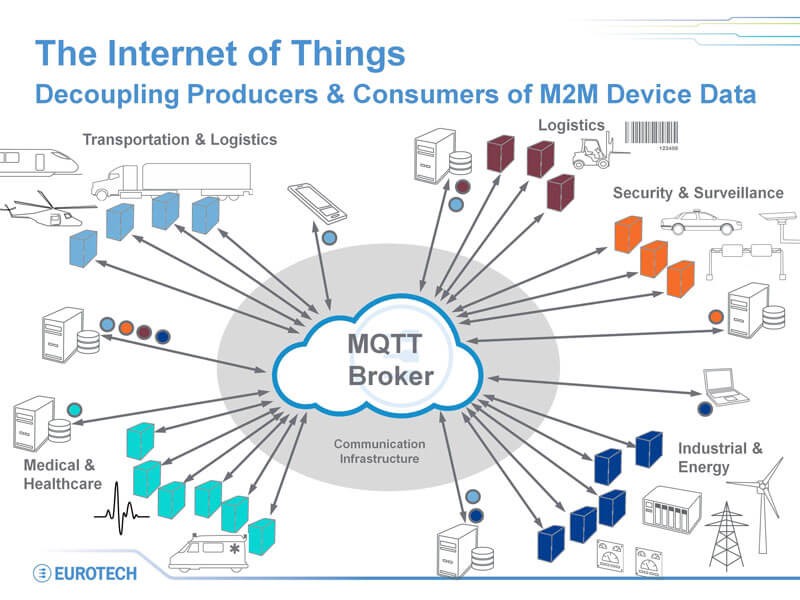
MQTT uses a PUSH/SUBSCRIBE architecture to run on top of TCP/IP. There are two sorts of systems in MQTT architecture: clients and brokers. The server with which the clients communicate is known as a broker. Client messages are received by the broker, who then forwards them to other clients. Clients connect to the broker rather than communicating directly with one another.
When a client (known as a “publisher”) wants to spread information, it will publish to a specific topic, and the broker will then send that information to any customers (known as “subscribers”) that have subscribed to that subject.
Any client can be both a publisher and a subscriber. The clients are usually unaware of each other and are only aware of the broker who acts as an intermediary. The “pub/sub model” is a popular term for this structure.
MQTT also reduces transmissions by using a well-defined, compact message structure. In comparison to HTTP, each message has a fixed header of only 2 bytes.
OTA
Instead of needing the user to connect the ESP32 to a computer via USB to execute the update, OTA programming allows the user to update/upload new software to the ESP32 via Wi-Fi.
When there is no physical access to the ESP module, the OTA capability comes in handy. It helps to cut down on the time spent upgrading each ESP module during maintenance.
One of the most useful features of OTA is that it allows a single central location to deliver an update to many ESPs on the same network.
The only drawback is that you must include an additional OTA code with each drawing you publish to use OTA in the next update.
Ways To Implement OTA In ESP32
There are two ways to implement OTA functionality in ESP32.
1. Basic OTA — Over-the-air updates are sent through Arduino IDE.
2. Web Updater OTA — Over-the-air updates are sent through a web browser.
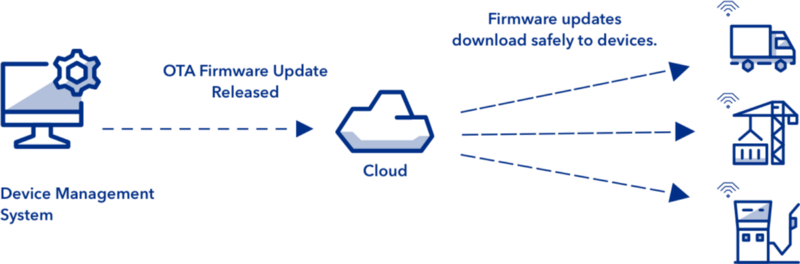
On an OTA architecture, there are two key components:
1. The remote device is in charge of checking for updates, downloading the new version, and installing it on its system.
2. The cloud server is in charge of creating, delivering, and managing updates to linked devices.
Security is key in IoT and we would need a way to verify that the binary file being downloaded is the correct file and not malware. This can be done by both systems, IoT devices and the Server. In this case, we use the server and ensure the communication is encrypted in between. This will reduce the IoT device work while sending the work to the server.
Circuit
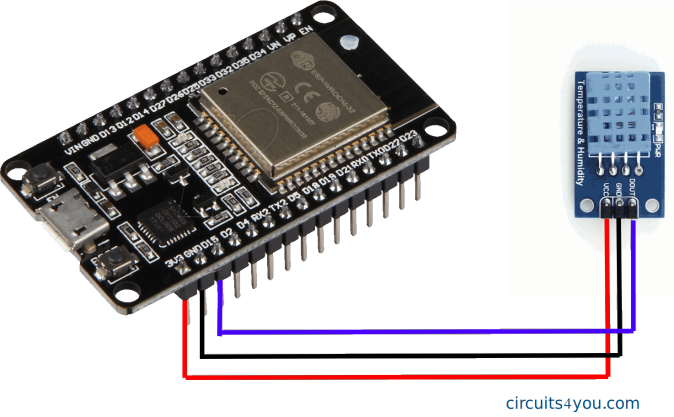
The DHT11 has the following connecting wires:
- GND is a common ground for both the dht11 and microcontroller.
- 5 V is a positive voltage that powers the dht11.
- Control transmit data
Wiring the DHT11 to the SES development board is easy:
1. Connect the VCC pin(Red wire) to the 5V on the SES development board.
2. Connect the GND pin(Black wire) to the ground.
3. Connect the Data pin(Purple wire) to pin 15(i.e You can use any GPIO pins as the Data Pin)
Code
Credentials
Set the Wifi, and MQTT credentials to publish messages to the MQTT server.
#define WIFI_SSID your_wifi_ssid
#define WIFI_PASSWORD your_wifi_password
#define MQTT_SERVER your_mqtt_server_url
#define MQTT_USER your_mqtt_username
#define MQTT_PASS your_mqtt_password
Hardware integration code
Libraries
Here we import the necessary libraries we will need for our project. Some of these libraries cannot be found in the default setup. If that is the case, you can install them in your setup by going to Sketch > Include Library > Manage Libraries and search for the library name as follows:
#include <Arduino.h>
#include <DNSServer.h>
#include <WebServer.h>
#include <WiFi.h>
#include <HTTPClient.h>
#include <Update.h>
#include <WiFiManager.h>
#include <Arduino.h>
#include <Adafruit_Sensor.h>
#include <DHT.h>
#include <DHT_U.h>
#include “./config.h” //contains our passwords
#include <PubSubClient.h> //For publishing messages to the MQTT Server
#include <ArduinoJson.h> //To create the payload so that we can publish it to the subscribed topics
Declaration, definition and initialization
Declare, and define variables and initialize classes.
#define CURRENT_VERSION “1.0.0” // The current version of the firmware running
#define DOWNLOAD_URL SERVER_URL // The server url where we will get the latest firmware version
#define DHTPIN 2 // Digital pin connected to the DHT sensor
#define DHTTYPE DHT11 // DHT 11
#define LED 4 // Digital pin connected to the inbuilt LED
#define ARDUINOJSON_USE_LONG_LONG 1
#define ARDUINOJSON_USE_DOUBLE 1
WiFiClient espClient; //Initializing the WiFiClient
void setup_wifi();
void reconnect();
PubSubClient client(espClient); // Initializing the PubSubClient
WebServer server(80); // Initializing the WebServer
// functions to take care of OTA firmware update
void handleRoot();
String getDownloadUrl();
bool downloadUpdate(String);
DHT_Unified dht(DHTPIN, DHTTYPE);
int ledState = LOW; // Set the ledstate to be off at the first instance
const long interval = 1000; // This is the interval we will be using to check for a new version
unsigned long previousMillis = 0; // previous timings in milliseconds
unsigned long currentMillis; // current timings in milliseconds
bool success; // download success
setup function
void setup() {
Serial.begin(115200); // begin Serial at 115200 baud rate
setup_wifi(); // function to setup up wifi
espClient.setServer(mqtt_server, 1883); //Setup the MQTT server
// Initialize device.
dht.begin();
Serial.println(F("DHTxx Unified Sensor Example"));
// Print temperature sensor details.
sensor\_t sensor;
dht.temperature().getSensor( & sensor);
Serial.println(F(" - - - - - - - - - - - - - - - - - - "));
Serial.println(F("Temperature Sensor Present"));

// Print humidity sensor details.dht.humidity().getSensor(&sensor);
Serial.println(F(" - - - - - - - - - - - - - - - - - - "));
Serial.println(F("Humidity Sensor Present"));
Serial.setDebugOutput(true); // Set debug to true in order to print more serial output
pinMode(LED, OUTPUT); // Initialize the inbuilt led as an output device
delay(3000); // Set a delay of 3 seconds (optional)
String version = String("<p>Current Version - v") + String(CURRENT\_VERSION) + String("</p>");
Serial.println(version);
// Setup Wifi Manager
WiFiManager wm;
WiFiManagerParameter versionText(version.c\_str());
wm.addParameter( & versionText);
if (!wm.autoConnect()) {
    Serial.println("failed to connect and hit timeout");
    ESP.restart();
    delay(1000);
}
// Check if we need to download a new version
String downloadUrl = getDownloadUrl();
if (downloadUrl.length() > 0) {
    success = downloadUpdate(downloadUrl);
    if (!success) {
        Serial.println("Error updating device");
    }
}
server.on("/", handleRoot);
server.begin();
Serial.println("HTTP server started");
Serial.print("IP address: ");
Serial.println(WiFi.localIP());
}
Loop Function
void loop() {
// Get temperature event and print its value.
sensors_event_t event;
dht.temperature().getEvent( & event);
if (isnan(event.temperature)) {
Serial.println(F(“Error reading temperature!”));
} else {
Serial.print(F(“Temperature: “));
Serial.print(event.temperature);
Serial.println(F(“°C”));
}
// Get humidity event and print its value.
dht.humidity().getEvent( & event);
if (isnan(event.relative_humidity)) {
Serial.println(F(“Error reading humidity!”));
} else {
Serial.print(F(“Humidity: “));
Serial.print(event.relative_humidity);
Serial.println(F(”%”));
}
currentMillis = millis();
if (currentMillis - previousMillis >= interval) {
previousMillis = currentMillis;
ledState = ledState == LOW ? HIGH : LOW;
digitalWrite(4, ledState);
}
// Just chill
server.handleClient();
delay(1000);
char msg[200];
if (!espClient.connected()) {
reconnect();
}
StaticJsonBuffer < 300 > JSONbuffer;
JsonObject & JSONencoder = JSONbuffer.createObject();
JSONencoder[“time”] = millis();
JSONencoder[“temperature”] = event.temperature;
JSONencoder[“humidity”] = event.relative_humidity;
char JSONmessageBuffer[100];
JSONencoder.printTo(JSONmessageBuffer, sizeof(JSONmessageBuffer));
Serial.println(JSONmessageBuffer);
if (espClient.publish(“dht/user_id892”, JSONmessageBuffer) == true) {
Serial.println(“Success sending message”);
} else {
Serial.println(“Error sending message”);
}
espClient.loop();
}
Handle server requests
void handleRoot() {
server.send(200, “text/plain”, “v” + String(CURRENT_VERSION));
}
Get download link
String getDownloadUrl() {
HTTPClient http;
String downloadUrl;
Serial.print(”[HTTP] begin…\n”);
String url = DOWNLOAD_URL;
http.begin(url);
Serial.print("[HTTP] GET…\n");
// start connection and send HTTP header
int httpCode = http.GET();
// httpCode will be negative on error
if (httpCode > 0) {
// HTTP header has been send and Server response header has been handled
Serial.printf("[HTTP] GET… code: %d\n", httpCode);
// file found at server
if (httpCode == HTTP_CODE_OK) {
String payload = http.getString();
Serial.println(payload);
downloadUrl = payload;
} else {
Serial.println(“Device is up to date!”);
}
} else {
Serial.printf("[HTTP] GET… failed, error: %s\n", http.errorToString(httpCode).c_str());
}
http.end();
Serial.println(downloadUrl);
return downloadUrl;
}
Download binary firmware
/*
Download binary image and use Update library to update the device.
*/
/*
Download binary image and use Update library to update the device.
*/
bool downloadUpdate(String url) {
HTTPClient http;
Serial.print("[HTTP] Download begin…\n");
http.begin(url);
Serial.print("[HTTP] GET…\n");
// start connection and send HTTP header
int httpCode = http.GET();
if (httpCode > 0) {
// HTTP header has been send and Server response header has been handled
Serial.printf("[HTTP] GET… code: %d\n", httpCode);
// file found at server
if (httpCode == HTTP_CODE_OK) {
int contentLength = http.getSize();
Serial.println(“contentLength : " + String(contentLength));
if (contentLength > 0) {
bool canBegin = Update.begin(contentLength);
if (canBegin) {
WiFiClient stream = http.getStream();
Serial.println(“Begin OTA. This may take 2–5 mins to complete. Things might be quite for a while.. Patience!”);
size_t written = Update.writeStream(stream);
if (written == contentLength) {
Serial.println(“Written : " + String(written) + " successfully”);
} else {
Serial.println(“Written only : " + String(written) + “/” + String(contentLength) + “. Retry?”);
}
if (Update.end()) {
Serial.println(“OTA done!”);
if (Update.isFinished()) {
Serial.println(“Update successfully completed. Rebooting.”);
ESP.restart();
return true;
} else {
Serial.println(“Update not finished? Something went wrong!”);
return false;
}
} else {
Serial.println(“Error Occurred. Error #: " + String(Update.getError()));
return false;
}
} else {
Serial.println(“Not enough space to begin OTA”);
client.flush();
return false;
}
} else {
Serial.println(“There was no content in the response”);
client.flush();
return false;
}
} else {
return false;
}
} else {
return false;
}
}
Setup WIFI function
void setup_wifi() {
// Connecting to a WiFi network
WiFi.begin(ssid, password);
while (WiFi.status() != WL_CONNECTED) {
delay(500);
Serial.print(”.”);
}
Serial.println(“WiFi connected”);
Serial.println(“IP address: “);
Serial.println(WiFi.localIP());
}
Reconnect function
void reconnect() {
// Loop until we’re reconnected
Serial.println(“In reconnect…”);
while (!espClient.connected()) {
Serial.print(“Attempting MQTT connection…”);
// Attempt to connect
if (espClient.connect(“SES_DHT”, MQTT_USER, MQTT_PASS)) {
Serial.println(“connected”);
} else {
Serial.print(“failed, rc=”);
Serial.print(espClient.state());
Serial.println(” try again in 5 seconds”);
delay(5000);
}
}
}
Subscription
How you handle the reception of data all depends on your level of expertise. One could set up a decoy MQTT server in their local station device
and tap into the data from the open port for their own application or just simply:
Configure HiveMQ browser client to visualize the data in the browser
Procedure:
1. Go to this [link](http://www.hivemq.com/demos/websocket-client/) and click on connect button.
2. Add the subscription topics one for each topic the ESP32 uses.
As soon as the ESP32 client start publishing data to the one topic in our code you should be able to see the changes in the page under the messages.
Important
The code provided above uses the Serial library for debugging purposes. The whole setup will only operate with the Serial port open.
For deployment, comment out all the Serial instances in the code above.
The whole code can be found here
As an IoT product there’s nothing like the excitement of getting the first version of the product out — it gives one that adrenaline pump.
- Bipin RR, VP Digital Services, Tata Elxsi
If you liked this article, click the👏 multiple times below so other people will see it here on Medium.
Let’s be friends on Twitter. Happy Coding 😉
Acknowledgements
1. Kelvin Gitu
2. Washington Kamadi
3. Calvin Mwadime
References
1. https://blackd0t.gitbook.io/africastalking-eris-devkit-playground/arduino/dht11
2. https://lastminuteengineers.com/esp32-ota-web-updater-arduino-ide/
3. https://microcontrollerslab.com/esp32-ota-over-the-air-updates-asyncelegantota-library-arduino/
4. https://www.survivingwithandroid.com/esp32-mqtt-client-publish-and-subscribe/
5. https://www.allacronyms.com/MQTT/Message_Queuing_Telemetry_Transport
6. https://horasvilla.com/iot-and-iiot-what-is-the-difference-between-them/